Glory X40 GT Connect Computer Tutorial
The Glory X40 GT is the latest product of the Glory series. It has a very high configuration. In order to assist users' daily office needs, it also adds a computer connection mode, which can help you complete daily office content more efficiently. However, many users do not know how the Glory X40 GT should be connected. Let's take a look at the detailed operation.

Glory X40 GT Computer Connection Tutorial
1. First, on the Glory 9 main interface, click to enter [Settings], and then click to enter [About Mobile Phone], and then find [Version No.] below, and then click "Version No." 5-7 consecutively.
2. Click continuously until [You are now in developer mode] appears, indicating that the Glory 9 developer option has been activated. Then return to the [Settings] page and continue to pull down. The [Developer Options] setting option can be found at the bottom. Select to open USB debugging.
3. First, take out the USB data cable from the package of Glory 9, then connect the phone to the USB interface of the computer, and connect the phone to the computer through the data cable
4. Download and install any assistant tools in the computer, such as Pea pod, Machine Scrub Wizard, 360 Phone Assistant, etc. After opening, you can automatically detect Glory 9. When you connect to the computer for the first time, you will be prompted to install a driver for the phone.
After the driver installation is completed, the mobile assistant in the computer can recognize the Glory 9 mobile phone, and we can use tools to perform ROOT, file management, and flash operations on Glory 9.
I believe that after reading the above introduction, you have already understood how the Glory X40 GT connects computers. Xiao Bian prefers the most common USB debugging method to complete the connection. It is also convenient to operate if there is a data cable, and you don't need to download other redundant apps.
Related Wiki
-

What sensor is the main camera of iPhone 16?
2024-08-13
-
What upgrades does iPhone 16 have?
2024-08-13
-
Does iPhone 16 have a mute switch?
2024-08-13
-
How about the battery life of iPhone 16?
2024-08-13
-
What is the peak brightness of the iPhone 16 screen?
2024-08-13
-
Does Huawei MatePad Pro 12.2-inch soft light version support satellite communication?
2024-08-12
-
What is the screen resolution of Huawei MatePad Pro 12.2-inch soft light version?
2024-08-12
-
How to close background programs on iPhone 16pro?
2024-08-12


Hot Wiki
-
What is the screen resolution of one plus 9RT
2024-06-24
-
How to activate RedmiNote13
2024-06-24
-
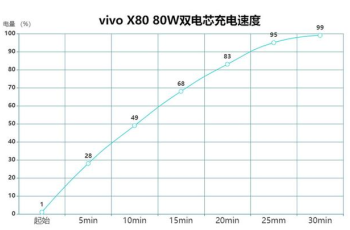
vivo X80 dual core 80W flash charging time introduction
2024-06-24
-
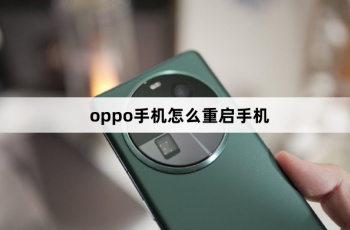
How to restart oppo phone
2024-06-24
-
Redmi K50NFC Analog Access Card Tutorial
2024-06-24
-
How to split the screen into two apps on Xiaomi 14pro
2024-06-24
-
Is iQOO 8 All Netcom
2024-06-24
-
How to check the battery life of OPPO Find X7
2024-06-24
-
Introduction to iPhone 14 Series NFC Functions
2024-06-24
-
How to set fingerprint style on vivo Y100
2024-06-24